Environment Setup
Prerequisites
(If you are connecting to your own Desktop machine) Please ensure a version of PyTorch compiled with CUDA is installed in your current environment. To verify this, run:
python -c "import torch; print(torch.version.cuda)"
which will print the CUDA version PyTorch is compiled with.
Next, clone our repository that contains the source code for the demo.
git clone https://github.com/CentML/asplos23-tutorial.git
Running the Jupyter Notebook
First, create a virtual environment and install the necessary dependencies.
virtualenv venv && source venv/bin/activate
pip install jupyter
Next, launch the notebook from the project directory:
cd asplos23-tutorial/project
jupyter notebook --ip 0.0.0.0
To connect to the notebook, following one of the listed instructions depending on your setup:
- If using your own workstation, create a tunnel to your machine with:
ssh -L 8888:localhost:8888 <machine_ip> - If using one of our provided VMs, access the notebook directly at
<machine_ip>:8888.
Install DeepView Backend
The following components should be installed on your GPU workstation.
The DeepView backend provides utility to profile your DL models (DeepView.Profile) as well as to predict its performance on other hardware (DeepView.Predict).
We install DeepView.Profile with:
pip install git+https://github.com/centml/DeepView.Profile.git
Next, install DeepView.Predict:
pip install http://centml-releases.s3-website.us-east-2.amazonaws.com/habitat/wheels-cu117/habitat_predict-1.0.0-0+cu117-py310-none-any.whl
Note, depending on the version of Python and CUDA installed on your machine, you might need to install the correct version of DeepView.Predict based on your environment:
export CUDA_VERSION=cu117
export PYTHON_VERSION=py39
pip install http://centml-releases.s3-website.us-east-2.amazonaws.com/habitat/wheels-${CUDA_VERSION}/habitat_predict-1.0.0-0+${CUDA_VERSION}-${PYTHON_VERSION}-none-any.whl
Install DeepView Frontend (DeepView.Explore)
Get the VSIX file with the following command in your remote machine
curl http://centml-releases.s3-website.us-east-2.amazonaws.com/skyline-vscode/skyline-vscode-0.1.0.vsix --output skyline-vscode-0.1.0.vsix
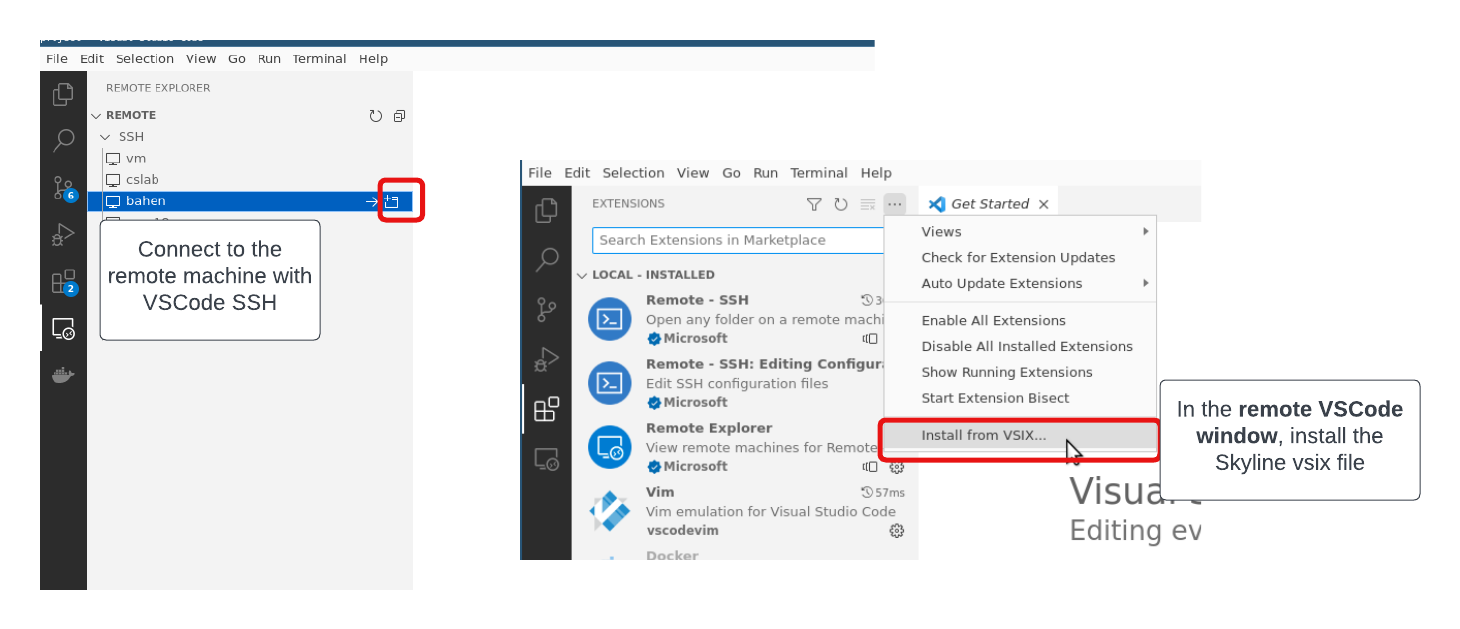
Install and launch VSCode on your local machine and connect to your remote machine with VSCode SSH. You will need the Remote - SSH extenstion installed on your local VSCode app.
Inside your remote VSCode connection, install the VSIX file as shown in the screenshot below.
